How to use the editor
1The editor at a glance
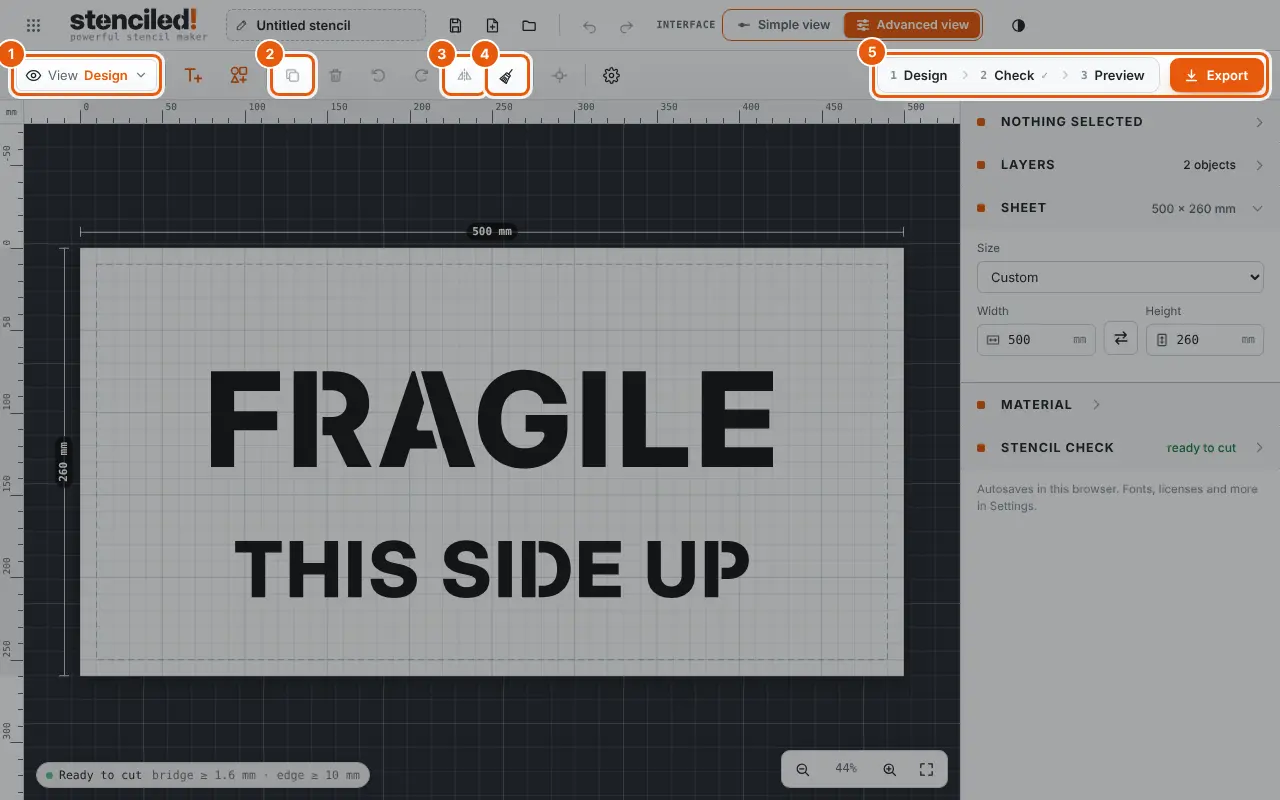
Everything happens on one screen. The numbers match the picture.
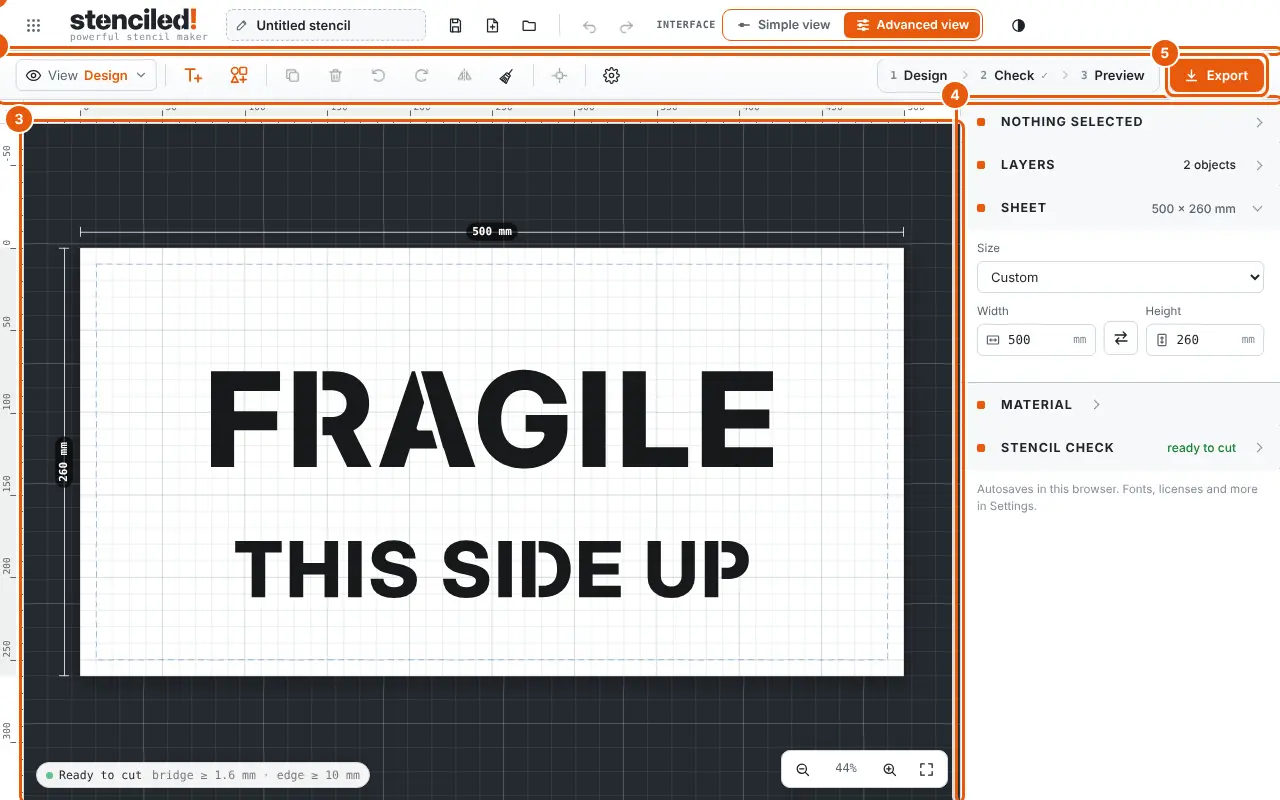
- Top bar — the stencil name, Save, My stencils, Undo / Redo, the Simple / Advanced switch and the theme.
- Toolbar — add text or a shape, delete, rotate, centre, settings (the gear).
- The sheet — your stencil in real millimetres. Drag to move, pull the corners to resize, double-click text to type.
- Settings panel — what you selected (text, shape or several objects), the sheet size and the stencil check.
- Export — download the file: PDF, image, SVG, DXF, EPS, STL / 3MF.
2First settings
Open the gear in the toolbar. The choices are remembered in your browser.
2.1Turn the rulers on or off; change the background, colours, language and units
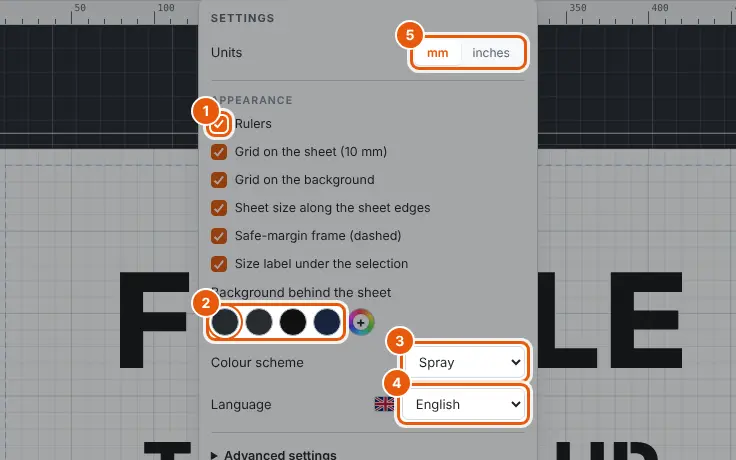
- Rulers along the top and the left edge. Off by default in the Simple view, on in Advanced; each view remembers your choice.
- Background behind the sheet: the cutting mat of the theme, graphite, black, navy or any colour from the picker.
- Colour scheme of the whole editor: Spray (orange), Cobalt (blue) or Ink (black and white).
- Language of the interface.
- Units: millimetres or inches, for every size in the editor.
Also here: a 10 mm grid on the sheet, a grid on the background, the sheet size along its edges, the dashed safe-margin frame and the size label under the selection.
2.2Switch between light and dark
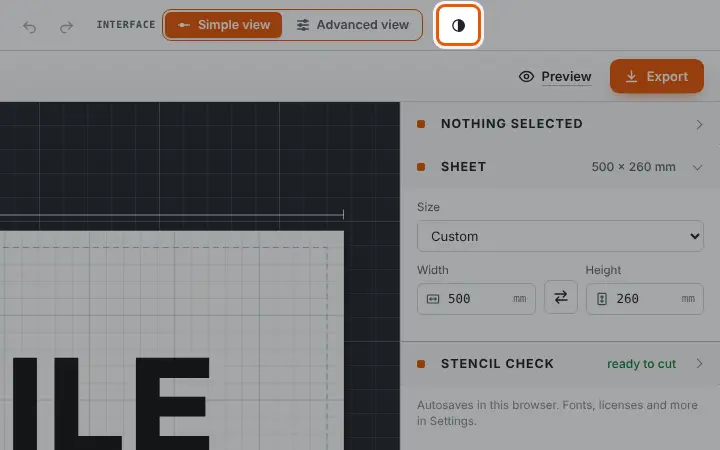
- Click the half-moon button: it cycles System → Light → Dark.
3Simple or Advanced view
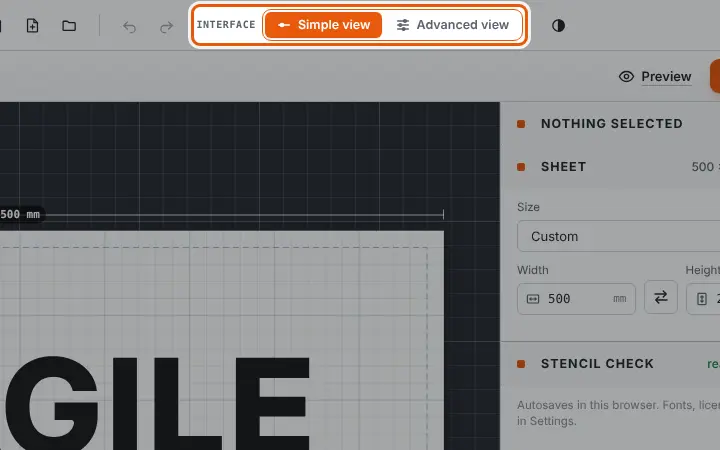
The switch in the top bar changes how much you see — not what the stencil can do. Start in Simple; switch to Advanced when you need more.
| Simple view | Advanced adds |
|---|---|
| Text: words, font, letter height and spacing, block size | Line spacing, alignment, text along an arc, rotation, break apart into letters |
| Shapes from the library, your own SVG | Duplicate, mirror, clear all |
| Bridges: generate, simple / reinforced, width, cut the middles out | Round sharp corners, cut away thin strips between letters |
| Sheet size, round sheets, stencil check | Layers, display modes (outline, cut preview), the 1 · 2 · 3 steps bar |
| Preview on a surface, every export | Rulers on by default, advanced settings (live check, scaling, arrow step) |
4Making a stencil (Simple view)
4.1Type and change the words
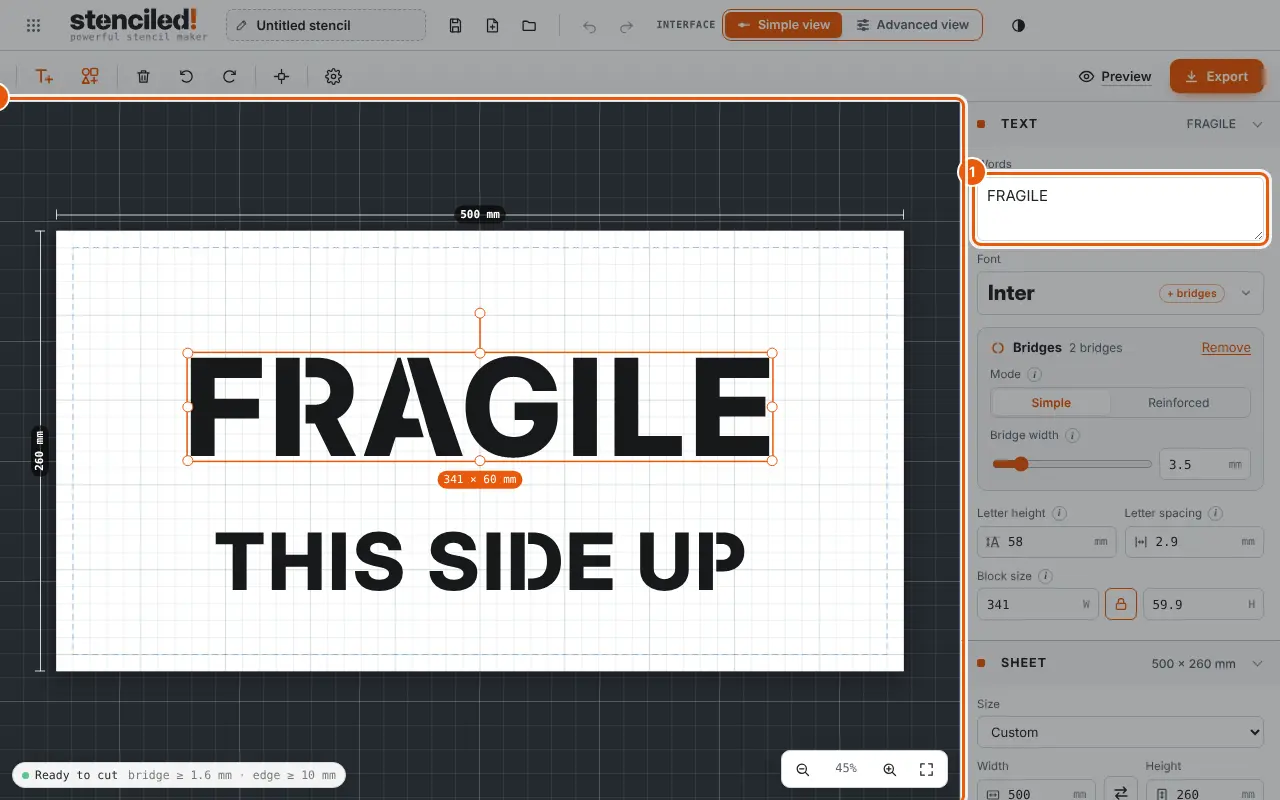
- Click the text on the sheet, then type in Words in the panel. New lines make new lines on the stencil.
- Or double-click the text on the sheet and type right there; Esc or Ctrl+Enter finishes.
4.2Choose a font
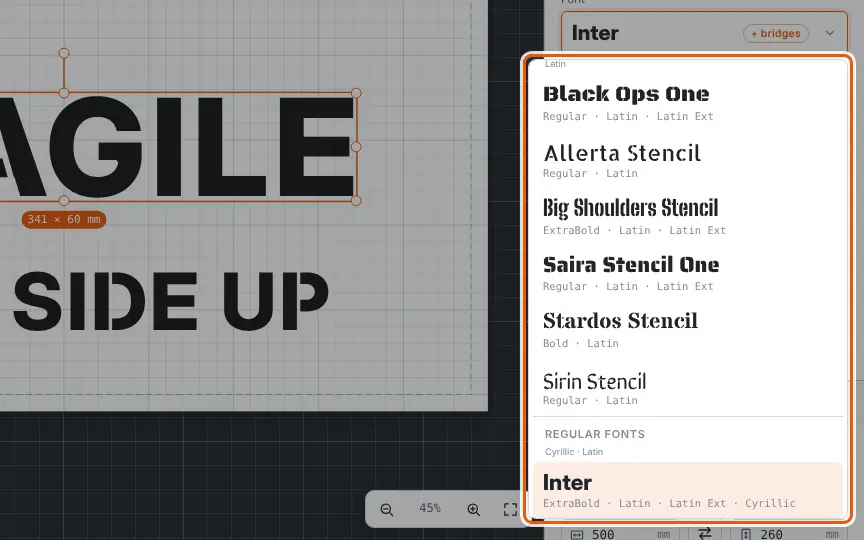
- Select the text and open the font list.
- Stencil fonts come with their own gaps. Regular fonts (tag «+ bridges») get bridges from the editor.
- Fonts that lack letters of your text are hidden — for Cyrillic you see only fonts that have it.
4.3Set the letter size, spacing and the size of the block
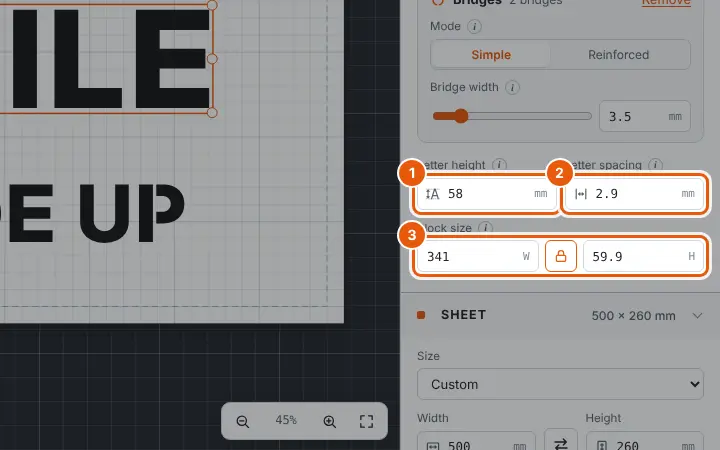
- Letter height in mm — the height of capital letters on the real stencil.
- Letter spacing — the gap between letters; 1–3 mm keeps letters from touching.
- Block size — width × height of the whole text. With the lock closed both change together; open it to stretch.
4.4Add more text or a shape
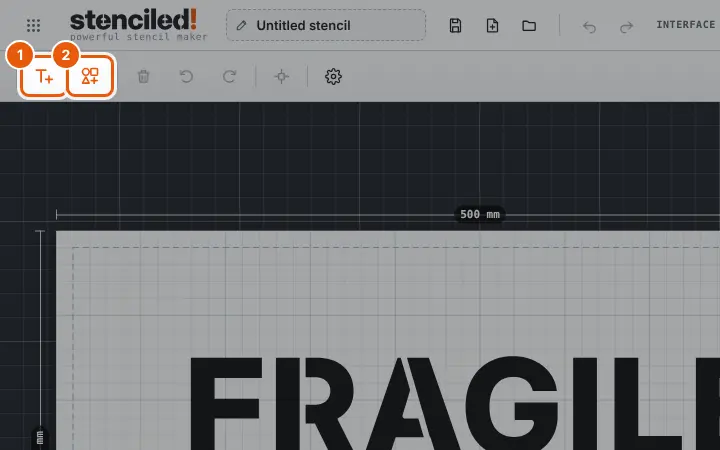
- T+ adds a new text (key T), sized to fit the sheet.
- The shapes button opens the library.
4.5Use a shape from the library or upload your own
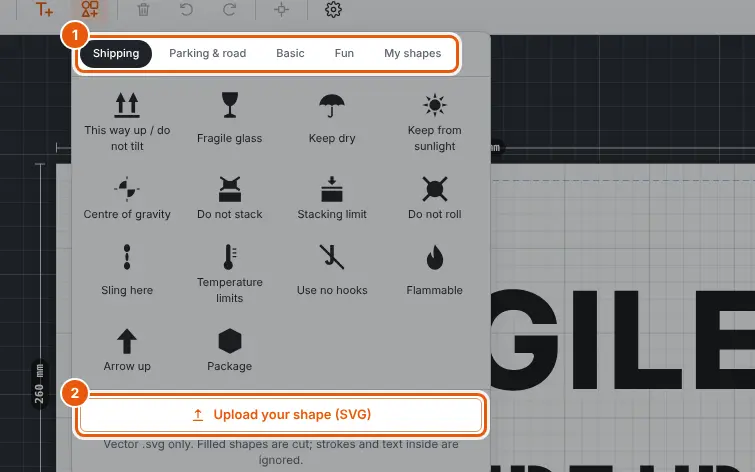
- Tabs: Shipping (ISO 780 handling marks), Parking & road (arrows), Basic, Fun, My shapes.
- Upload your shape (SVG): a single-colour SVG up to 300 KB. The editor reports what would fall out and offers to remove loose parts or keep them with bridges. Uploads stay in My shapes.
4.6Set the sheet size
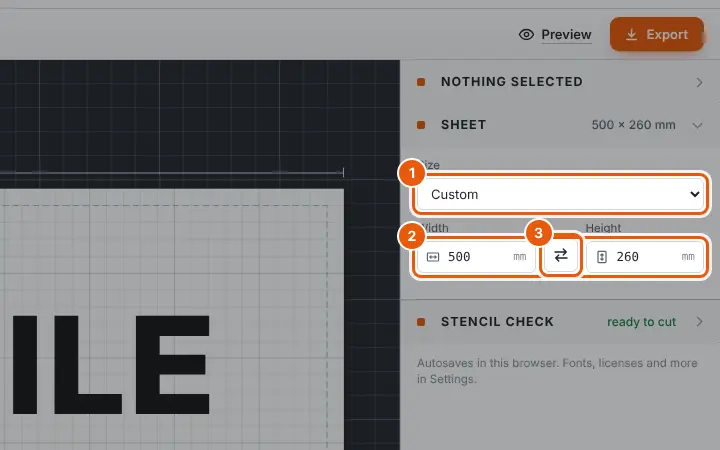
- Size: paper (A5–A1, Letter, Legal, Tabloid), laser beds, 3D printer beds, sheet material, round sheets or a banner.
- Or type your own width and height; the design stays centred.
- The arrows swap width and height (portrait ↔ landscape).
4.7Make a round stencil for a cake or coffee
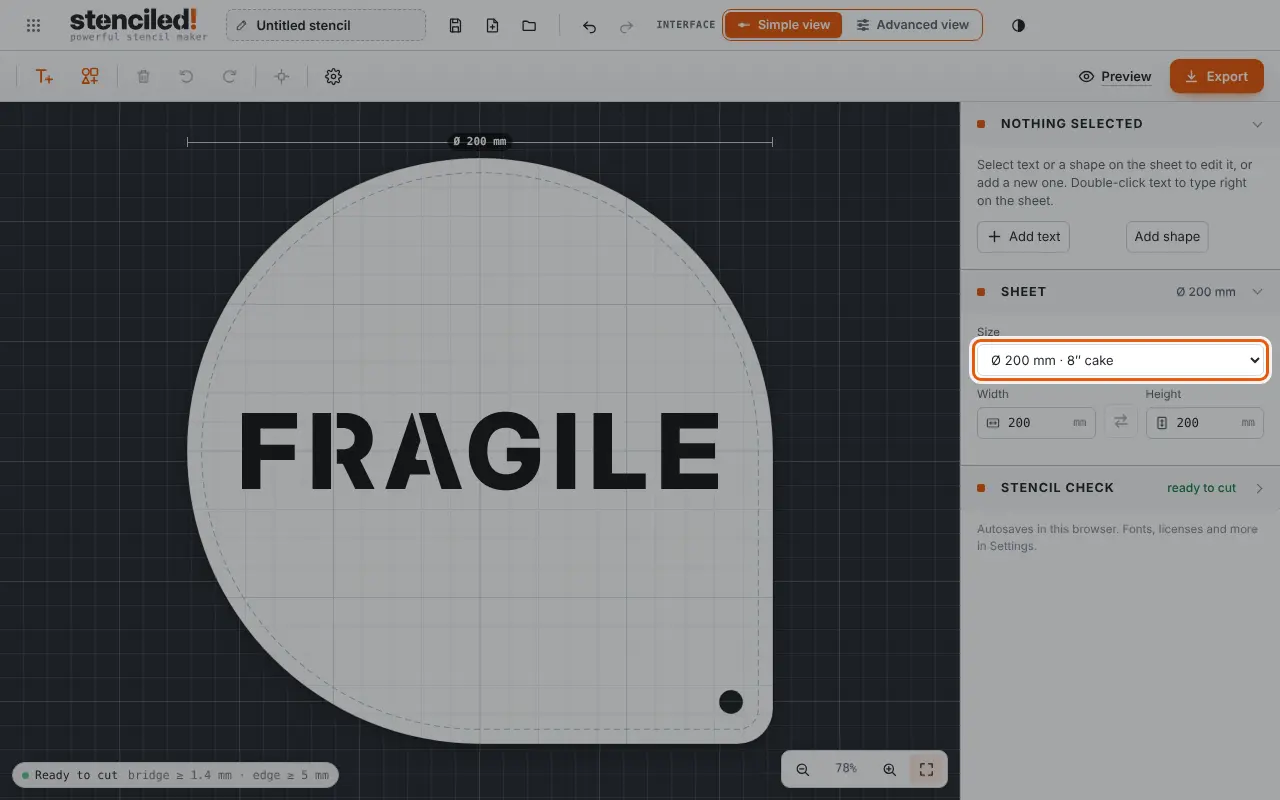
- Pick a Round size from Ø 60 to Ø 300 mm. The sheet gets a handle with a hole to hold and hang it; letters keep 5 mm from the rim.
4.8Add bridges so the middles do not fall out
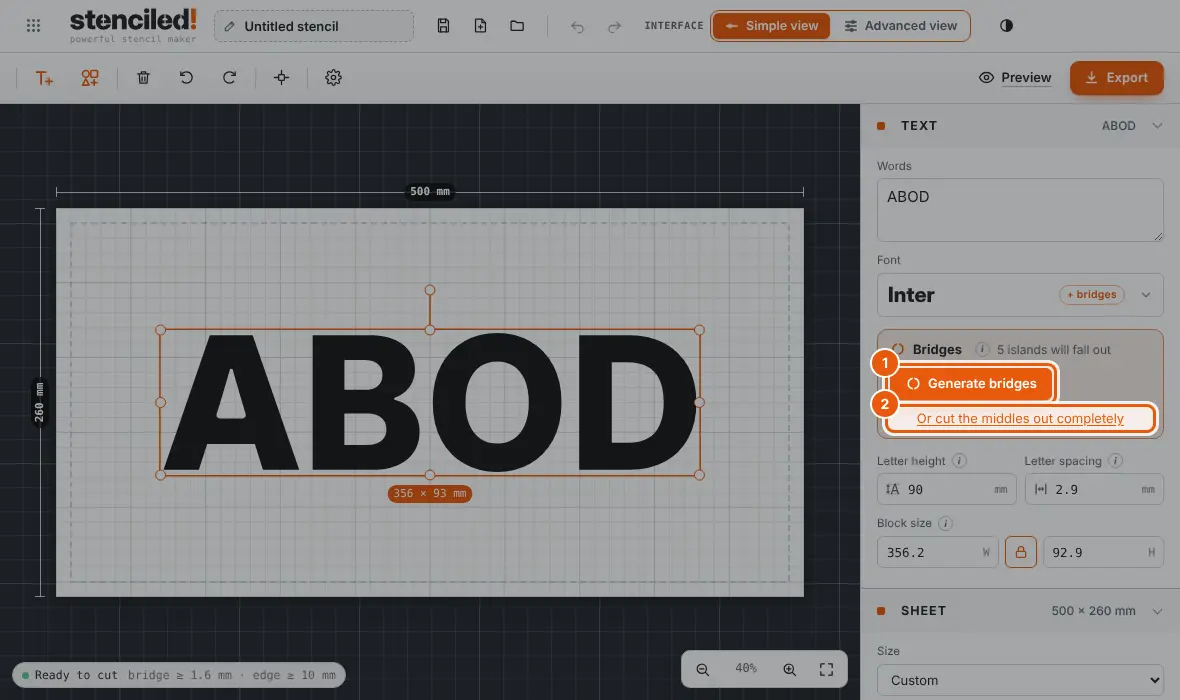
- Select the text: the Bridges box says how many islands would fall out. Click Generate bridges.
- Or cut the middles out completely — O becomes a solid dot. «Keep them» brings the middles back.
4.9Make bridges stronger or thinner
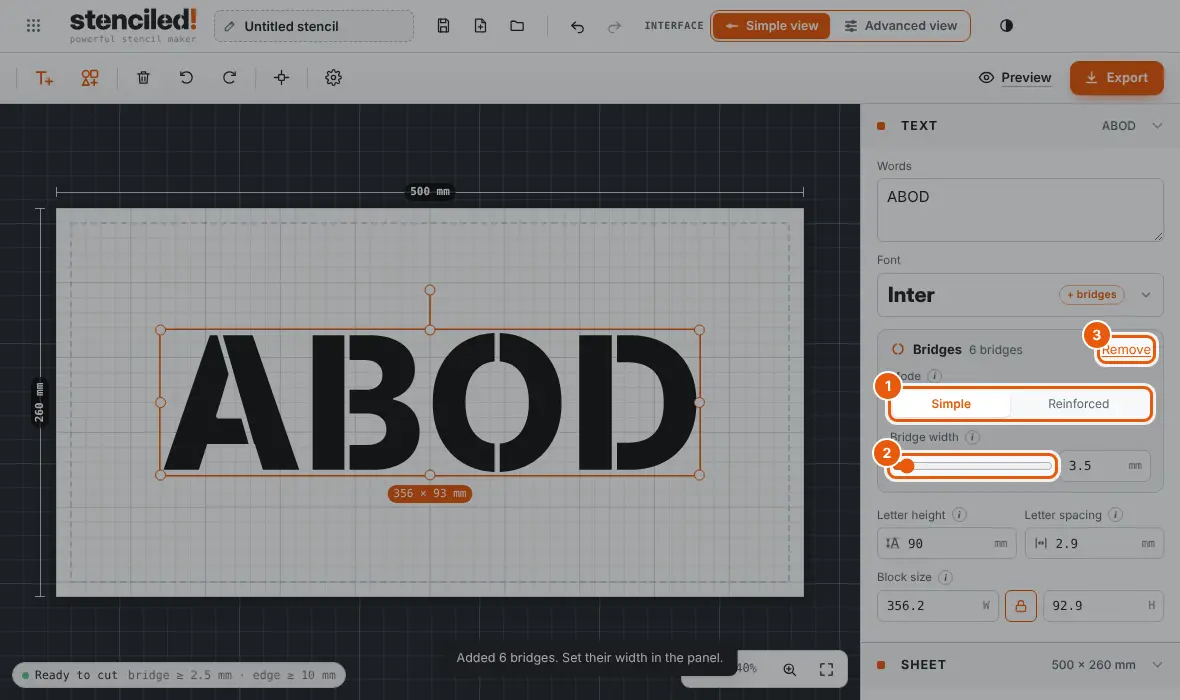
- Simple puts one bridge on each island; Reinforced adds a second one to big islands.
- Bridge width: the slider starts at the safe minimum for your letter size (1 mm for 15 mm letters … 4 mm for 250 mm).
- Remove takes the bridges away again.
4.10Fix what the stencil check finds
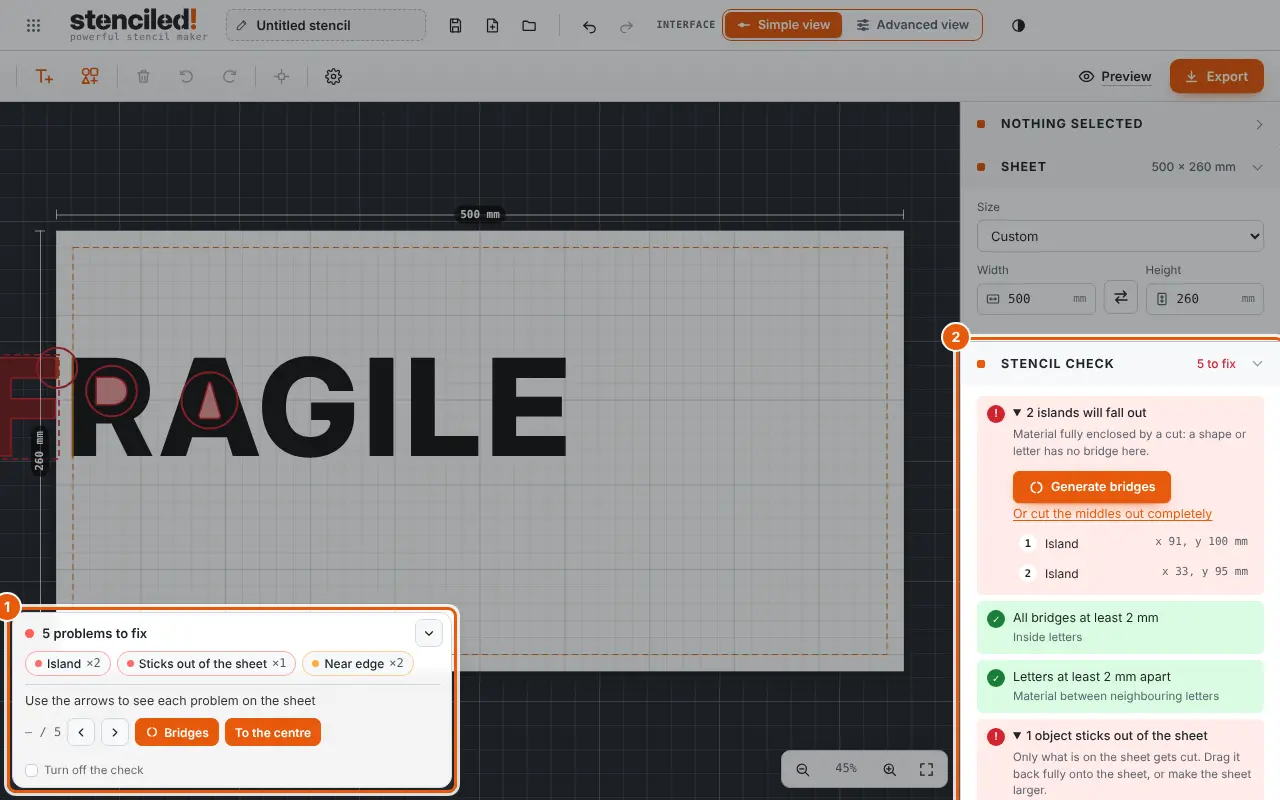
- The card on the sheet lists the problems: islands, thin bridges, letters too close, something outside the sheet or too near its edge. Arrows go from one to the next; each has a fix button (Bridges, To the centre, Cut through…) or Skip.
- The Stencil check section in the panel shows the same list; click a spot to jump to it. «Ready to cut» means the file is safe to export.
4.11Centre, rotate and delete
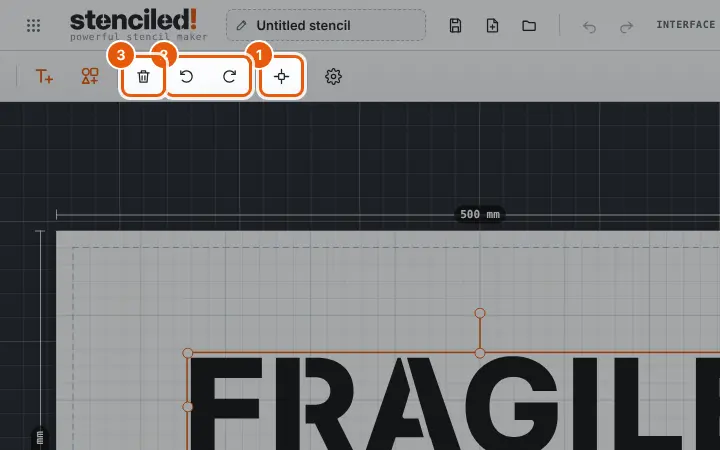
- Centre puts the selection in the middle of the sheet.
- Rotate 90° left or right; drag the round handle on the sheet for any angle (snaps every 15°).
- Delete (or the Del key); Undo brings it back.
4.12See it sprayed on a wall, asphalt or a T-shirt
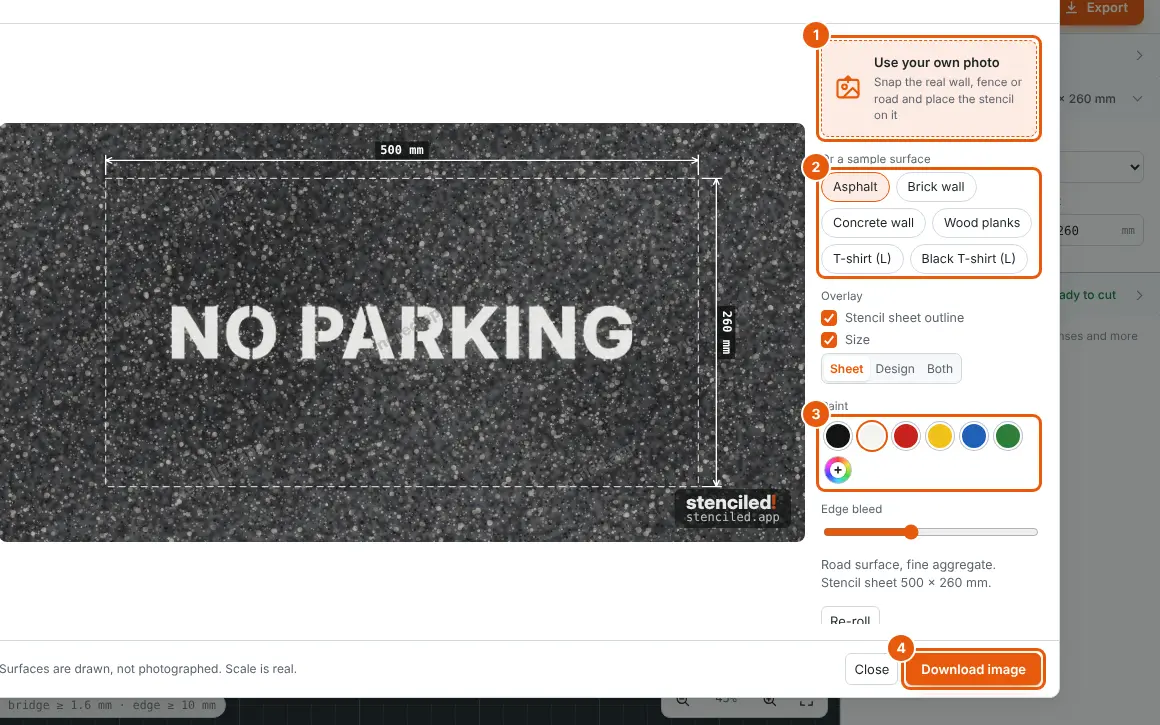
- Use your own photo: place the stencil on a picture of your wall — move and scale, or match the perspective with four corners.
- Sample surfaces: asphalt, brick, concrete, wood, white and black T-shirt, at real scale.
- Paint colour (or any colour), plus how much the paint bleeds under the edges.
- Download image saves the picture.
5What the Advanced view adds
5.1Display modes, duplicate, mirror, clear and the steps bar
- View: Design, Outline, Cut preview (keys 1 / 2 / 3).
- Duplicate (Ctrl+D).
- Mirror — for stencils used from the back, e.g. iron-on.
- Clear all — with Undo in the message.
- 1 Design · 2 Check · 3 Preview: Check jumps to the next problem.
5.2Look at the cut lines or the cut-out material
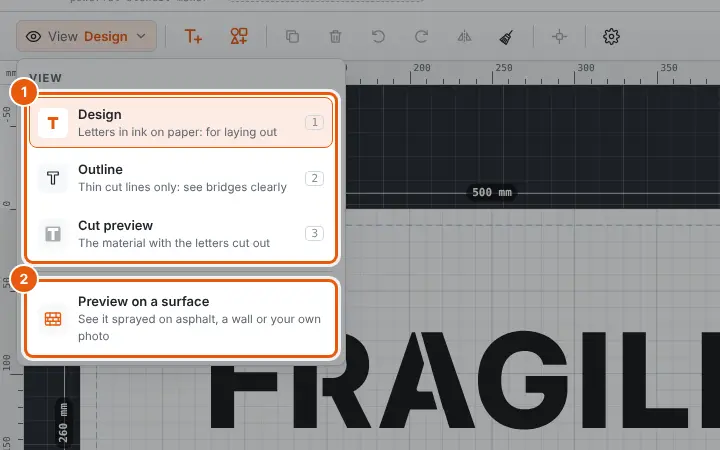
- Design: ink on paper; Outline: thin cut lines, bridges easy to see; Cut preview: the sheet with the letters cut out.
- Preview on a surface opens the mock-up.
5.3Line spacing, alignment, arc, rotation, break apart
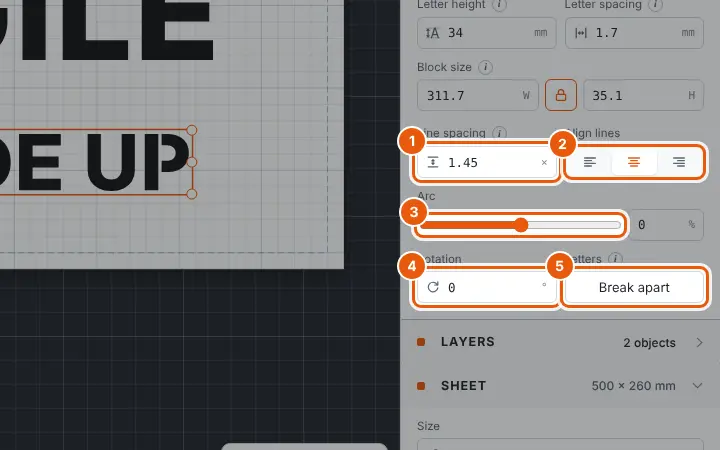
- Line spacing between lines of text.
- Align lines left, centre or right.
- Arc: bend the text up or down (−100…100 %) — for round stencils.
- Rotation in degrees.
- Break apart: every letter becomes its own object to move or resize; «Back to editable text» joins them again.
5.4Text along an arc
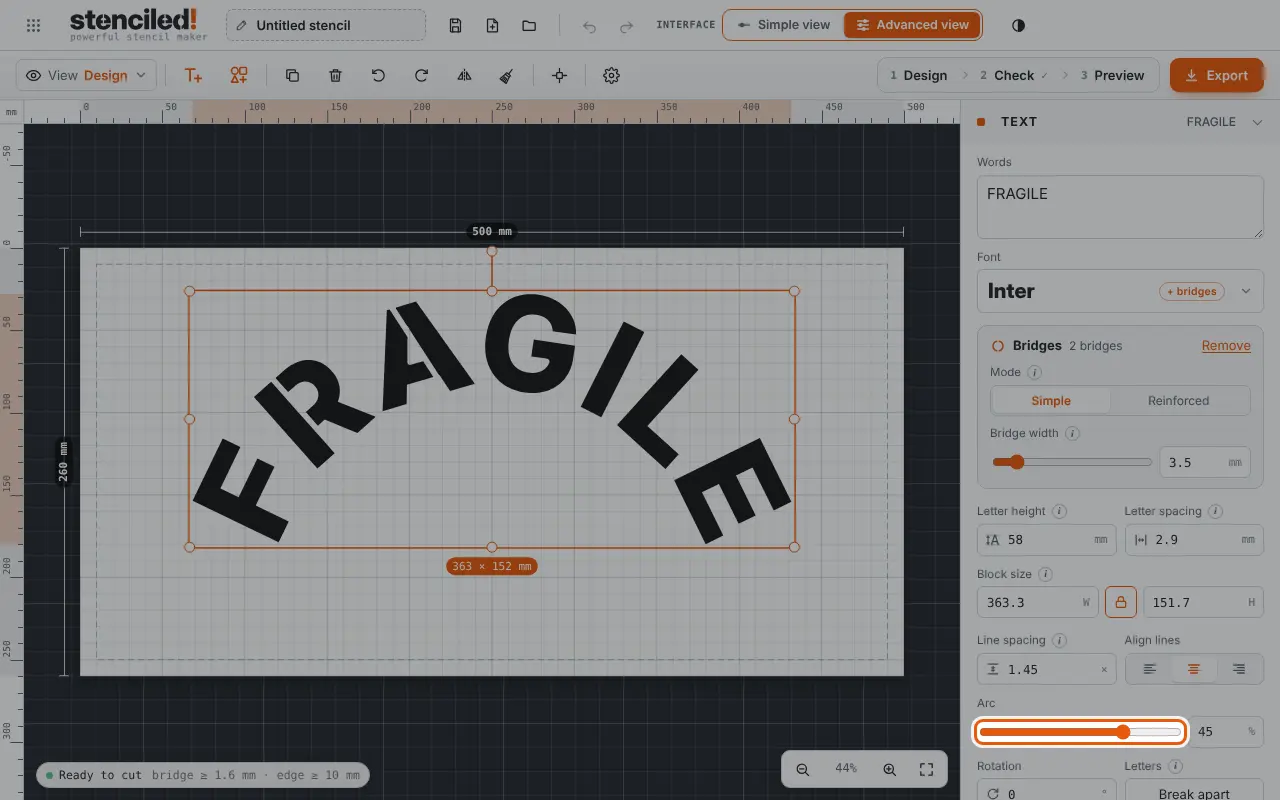
- Drag Arc: positive values arch the line upwards like a rainbow (the top of a round stencil), negative values bend it down (the bottom).
5.5Align, distribute and join several objects
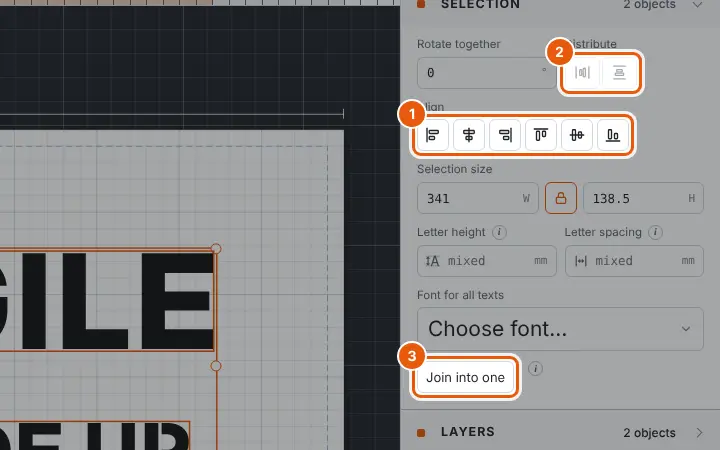
- Select several (Shift-click, or drag a box around them), then align left / centre / right / top / middle / bottom.
- Distribute with equal gaps (three objects or more).
- Join into one: overlapping parts merge into one piece to cut.
5.6Layers
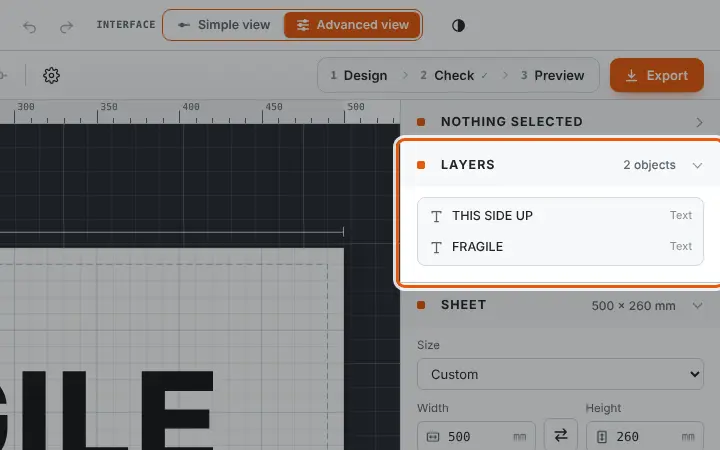
- Every object in a list: click to select, Shift-click to add, double-click to rename, drag to change the order.
5.7Round sharp corners, cut away thin strips
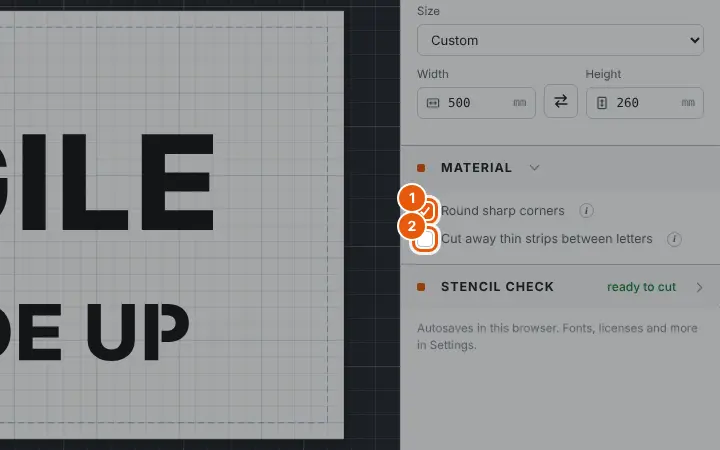
- Round sharp corners: inner corners get a small radius so the material does not tear there.
- Cut away thin strips between letters: where letters come too close, the strip between them is removed for the whole sheet.
5.8Advanced settings
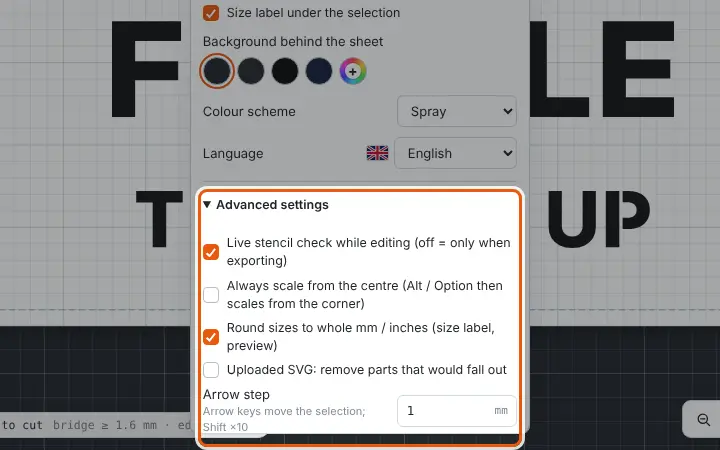
- Live stencil check (off = only when you export), always scale from the centre, round sizes to whole mm, uploaded SVG: remove loose parts, and the arrow step for moving with the keyboard.
6Export: which file and how
Click Export. Every format is free. If the check still finds problems you see them here first — you can export anyway.
6.1PDF to print at home or in a print shop
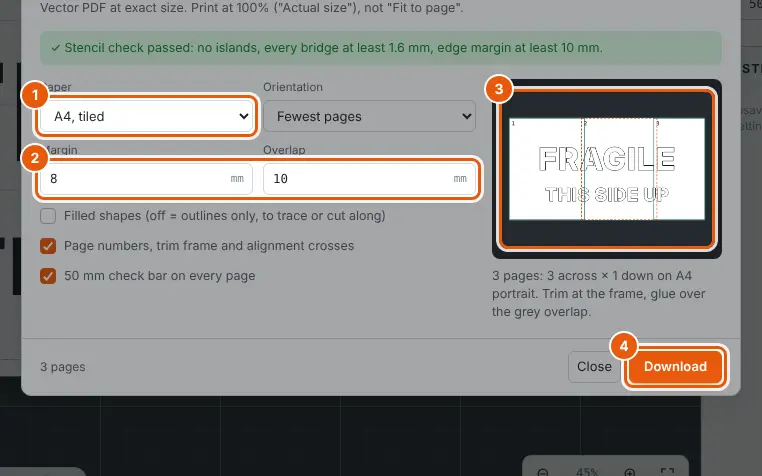
- Paper: the whole sheet on one page, or tiled on A4 / A3 / Letter / Legal / Tabloid.
- Margin and overlap (the grey strip where pages are glued); page numbers, trim frame and crosses; a 50 mm check bar.
- The preview shows how many pages you get.
- Download. Print at 100 % («Actual size»).
6.2JPG or PNG picture
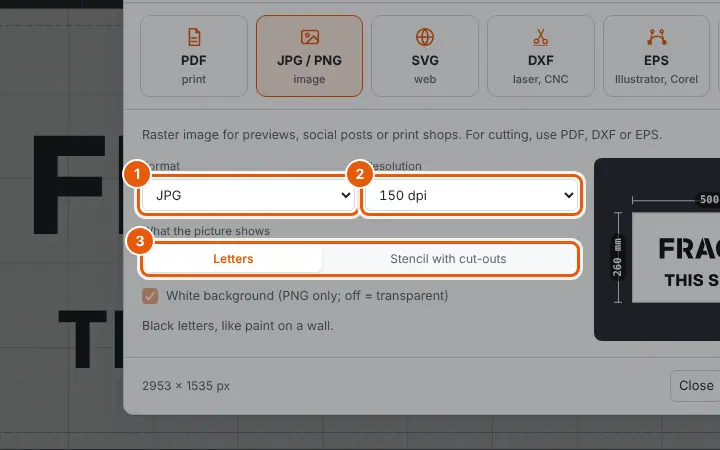
- Format JPG or PNG.
- Resolution: 96, 150, 300 or 600 dpi.
- Letters only, or the stencil with the cut-outs in a colour you choose.
6.3SVG for websites, Figma and Cricut
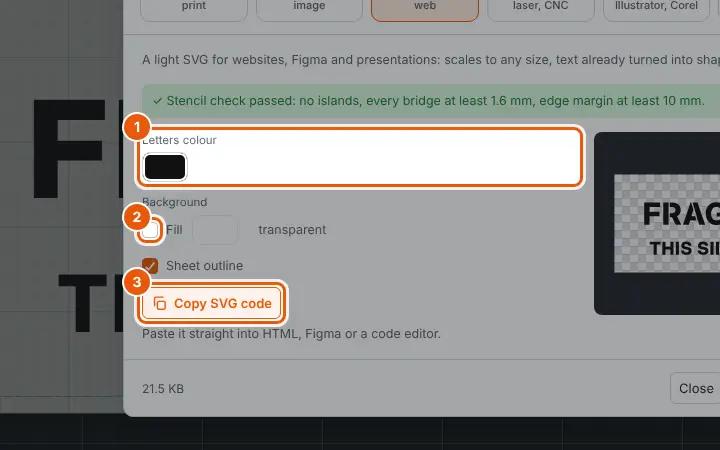
- Letters colour and opacity.
- A background (or transparent), the sheet outline.
- Copy SVG code to paste straight into HTML or Figma — or Download the file.
6.4DXF for laser cutters and CNC; EPS for Illustrator
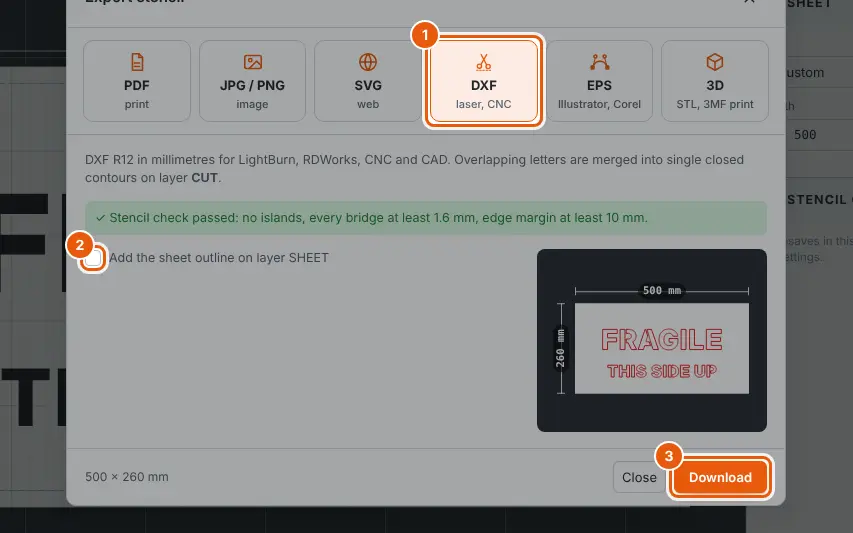
- The DXF tab: real millimetres, cut lines on the layer CUT.
- Optionally the sheet outline on its own layer SHEET.
- Download. The EPS tab next to it works the same for Illustrator and CorelDRAW.
6.5STL / 3MF for a 3D printer
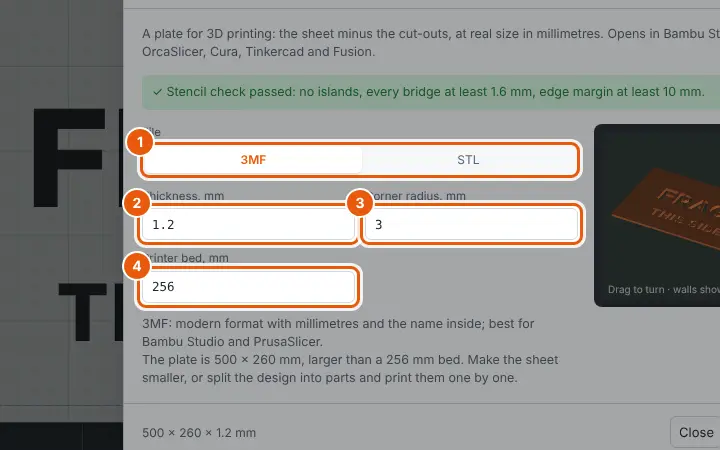
- 3MF (keeps units and name) or STL.
- Thickness 0.4–200 mm (1.2 mm is a good default).
- Corner radius of the plate.
- Printer bed: warns when the plate does not fit. Drag the 3D preview to turn it.
7Saving and files
7.1My stencils, project files and a fresh sheet
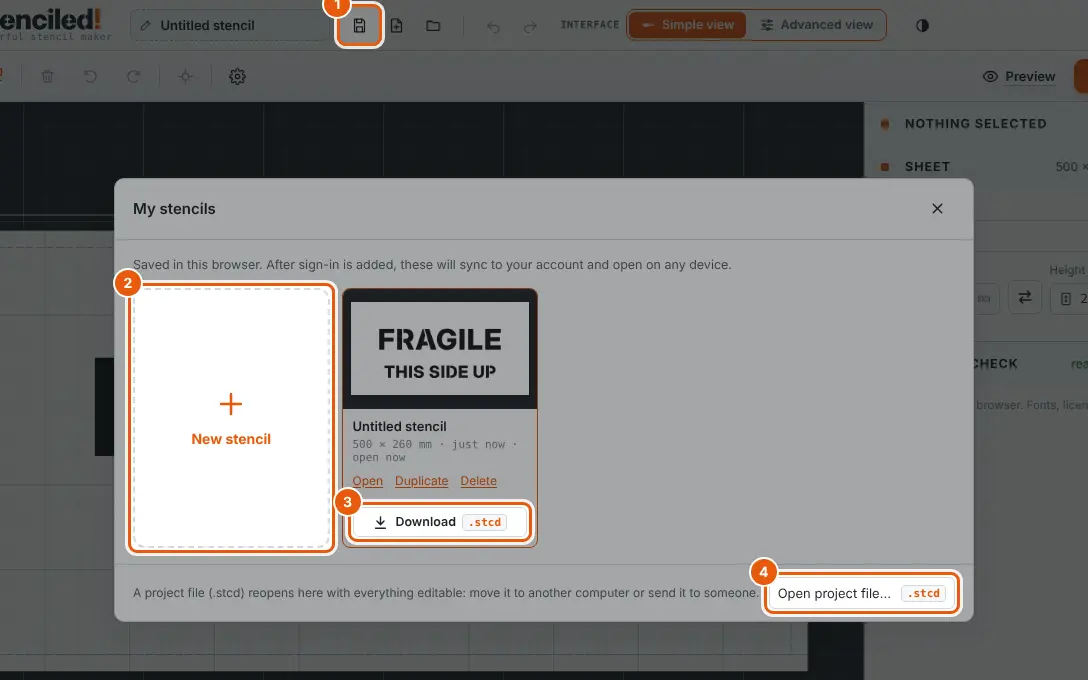
- Save (Ctrl+S) keeps the stencil in My stencils in this browser. Changes are also saved by themselves a few seconds later.
- New stencil starts an empty sheet; the current one stays in My stencils.
- Download .stcd: a small project file to move to another computer or send to someone.
- Open project file brings a .stcd back (you can also drop it on the sheet).
My stencils is also in the header of every page of this site: Edit opens the editor with that stencil.
8On a phone
8.1The phone layout
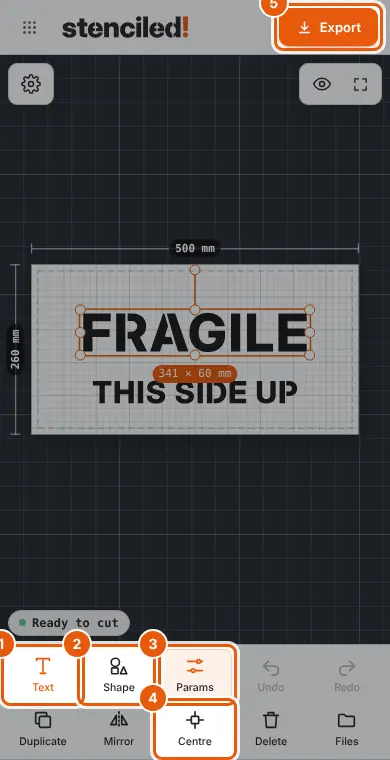
- Text adds a text.
- Shape opens the library.
- Params opens the settings of the selection.
- Centre it on the sheet.
- Export as on a computer.
Also at the bottom: Undo, Redo, Duplicate, Mirror, Delete and Files. The gear (top left) opens Settings, the eye (top right) the display modes and Preview on a surface.
8.2Edit the words and settings
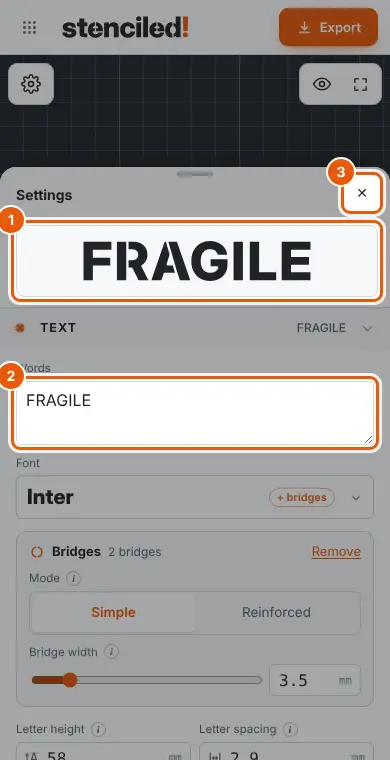
- Double-tap a text (or tap Params): the settings slide up; the picture on top shows the stencil.
- Change the words, font, size and bridges.
- Close with the cross or swipe down.
9Keyboard shortcuts
| Keys | Action |
|---|---|
| T | Add text |
| Enter / double-click | Edit the text on the sheet |
| Esc | Deselect / finish editing |
| Ctrl/⌘ + Z · Ctrl/⌘ + Shift + Z (or Y) | Undo · Redo |
| Ctrl/⌘ + S | Save to My stencils |
| Ctrl/⌘ + D | Duplicate |
| Ctrl/⌘ + A | Select everything |
| Ctrl/⌘ + C · V | Copy · paste (also text and SVG from other apps) |
| Del / Backspace | Delete |
| Arrows · Shift + arrows | Move by the arrow step (1 mm) · ×10 |
| + / − / 0 | Zoom in / out / fit the sheet |
| 1 / 2 / 3 | Design / Outline / Cut preview |
| Space + drag, or Alt + drag | Move around the sheet |
| Shift while resizing | Keep proportions |
| Alt while resizing | Scale from the centre |